Monday, January 12, 2015

Happy Holidays. I'm a Sick Person.

Well hello again,

So happy holidays and new year from the Stitchin' Bitch. It's weird to think I've been sort of doing this for over a year now but I'm not sure if it counts because of how often I don't write about what I do. Among other things this year, I made a shitty Vanessa (Human Ursula) for like the last minute but I thought it was okay. Sometimes, I still wear the gold shell necklace because I have a problem.


Now that the holiday season is over, I figured I'd belatedly create a tutorial for you all. This is how my sister and I wrap holiday gifts because we're terrible people and our friends know it. It's basically like a sick Turducken with adorable stuffed animals and makes for a fun and violent unwrapping session. And now, without further a-do, here is my stuffed animal gift-wrap tutorial.

the things my friend has to put up with...

You will need.

1. A few stuffed animals of various sizes.
2. the present you intend on actually giving a person.
Pictured: 2 corgis, a rhinoceros and a tube of super glue.
3. a seam ripper (I have a beautiful, hand crafted, wood-handled one I wear as a necklace sometimes.)
4. a needle and thread

5. snips/scissors
6. a tag gun (optional)
7. a pretty morbid sense of humor.

It should go without saying but it is important to note, I'm using stuffed animals and this wrapping project is a joke. Yes I do give people presents this way but no I do not advocate murdering precious little animals for amusement. I feel like this is gonna get met some "you're sick!" messages from someone eventually.

Y'all have have no idea how sick I am.

How to do this shit:

1. choose your smallest stuffed animal. You work from smallest to largest because that's how you stuff things into other things (I suppose.) Locate the seam along it's belly that will be your ripping guide.

Feel free to anesthetize your plushie if you'd like.
2. Once you locate the seam, start to rip it. This will be fairly difficult but as soon as you find the thread, the seam will pretty much rip itself.

3. Once the puppy's tummy is open, stuff your present inside (This time it was a tube of superglue for a white elephant exchange.)


 4. Sew your little guy up.


 5. Next, locate your next stuffed animal. Note that this one didn't have a stomach seam.


6. In case you don't have a center seam, take your scissors and time for some cuttin'.

snip snip!
7. Start removing some fluff from your larger stuffed animal to make room for the baby one. Fluff will get EVERYWHERE so be careful.


 8. Next stuff your little stuffed animal into your slightly larger stuffed animal.


 9. Sew up your medium stuffed animal and repeat the process on your final stuffed animal.

But first give him a big ol' hug.

Loooots of stuffing to remove, there.


Sew him all up.

10. From there you're pretty much done but there was one last touch my sister added. Make a tag saying something horrible like "My tummy hurts." or just "Cut me open." which at least accurate.

11. Using a tag gun (I have no idea where you get them, we just... have one) attach your tag.


 12. Et Voila, your plush Turducken of horror is complete. If your gift recipient already owns a knife, feel free to just give them instructions. If they do not, a card with a knife taped to the inside is a good, just-this-side-of-derranged addition to the schtick.

My mother was concerned. Mostly because she REALLY loved the giant rhino.
My friends get it, my parents are good natured but concerned but honestly, it's a pretty big crowd pleaser amongst the weirder of us. So if you're looking for a fun way to present your present (is that right?) to someone who loves you and probably gets you. It's also SUPER funny if you can find a shark plush.

Happy New Years, Bitches!

Next time: whatever the hell I want. Maybe I'll start doing pattern reviews, that or a chain mail diy? Do people want to see chain mail? Or perhaps I'll do something COMPLETELY DIFFERENT. WOOOOOOOOOOO

Here's my pet cat, sitting on my butt:


Friday, November 28, 2014

Nnnnnnnow, we can talk about it.

It's that time again, ladies and gentledudes. Thanksgiving food is digesting in your bellies (if you're American) and you're pretty much sick of hearing out Thanksgiving and people playing Christmas music too early (if you're not... or even if you are.) that said, I'm ready to get this shit started! If anyone wants to give me shit for starting this before December has even started I have one thing to say to you:


Since this is technically a Thanksgiving post, here are the things I'm thankful for:


  • The opportunity to become so much closer to many of my friends, and make new ones of old acquaintances 
  • A healthy and only mildly dysfunctional family (although, what family isn't)
  • communities of people who accept me and my insane pursuits
  • the opportunities to continue and find new brilliant and terrible pursuits.  


That said, lets get this show on the road. The following is almost completely copypasta'd from the old post but I've made new friends and fussed a bit with examples. But just in case, read and get yourself a refresher.

Presenting the 2014 Holiday Wishlist Project!!!

So here we go: 

A few years ago- probably around 2009 as I was poking around DeviantArt, an artist I followed came up with this project. Here's how it goes:

The Basics:

You write a wish list, other people write wish lists. You peruse their wish lists and see if you can grant any of theirs, and others do the same. It's about making someone's holiday a little brighter, not OMFG GIVE ME PRESENTS. It's a nice feeling to give to others and grant their wishes, y'know?

Step 1:

Write a Christmas/Holiday wish list of 10 things. It can be any 10 wishes you'd like to have granted, no matter what they are, possible or impossible. They can be simple and fun (I'd love a drawing of my favorite fandom pairing) to medium (I would like a copy of Black Swan) to big and over the top (I want a new house/computer/mini motorbike) to kind of technically un-grantable. (I want to ace all my classes this semester) Just things that you truly wish for this holiday season.

Post that list on the Holiday Wish List Event Page as a SEPARATE POST. Let me be clear, EVERY WISHLIST GETS IT'S OWN POST. That way people don't get confused with who's wishing for what.

Step 2

Poke around on the event page to see what other people have wished for, and here's where the magic happens: if you see a wish that you can grant, do so and make someone's wish come true! Perhaps you have an old leather jacket that you don't want anymore or a gift certificate you don't use- or who knows? Maybe your cat just had kittens and someone needs a furry new companion! Are you an expert at Physics and someone wished for a good grade in PHYS 101? Why don't you offer your hand at tutoring?

Remember, the key to this project is not to put people out, it's just a chance to help people who you might not have known you could have helped in the first place. Gifts can even be made anonymously if you'd like.

---

And that's about it. There are no super specific rules, no guarantees, and no strings attached. Just wish and send it out and maybe it'll come true. Give and you might receive and you'll get the joy of knowing you made someone's holiday special!

And if you'd like to know: 

My holiday wish list:


  1. To pass all my classes this semester and graduate in the spring
  2. An internship and eventually entry-level job that asks me to use at least some of the skills I've studied here at Uni.
  3. to learn to drape
  4. More ballet shrugs and other dance clothes
  5. a goddamn silicone mermaid tail (or at least the time, energy and space to make my own.)
  6. Holiday parties. Lots of them. The dress up kind. Also just more get togethers with lots of my good friends
  7. A new garment rack that is small enough to fit in my tiny bedroom
  8. Time and funds for new costumes!
  9. A banjo... and maybe lessons.
  10. A mistletoe kiss. (traditional at this point)
the project event page is linked here so if you for some reason are reading this and aren't my friend on facebook: here you go!


Sunday, July 27, 2014

With DIShonor!

Oh my God, it's like I have a blog or something...

So now that we're a little past halfway through July, life has calmed down... It's calmed a bit too much down... But I'll live. I really should appreciate the quiet moments.


But really, there is a balance between having a lot of work that needs to get done and not enough time to do it and blog about it and having absolutely nothing to do and right now I'm in the latter camp which means all the old projects I keep wanting to do start looking realistic. (I'm looking at you, mermaid tail.)

Oh yeah, there's a point to this post.

So THIS IS NOT in honor of SDCC because my Facebook feed is practically nothing but posts of people who are there, posts from people who are hanging out outside of there, post from people who wish they were there and posts from people who wish they were but are pretending like they don't want to be to save face. It just so happened that since it's summer, I've been growing my collection of sunglasses. And also because it's summer, I've been headed to the beach more. Also I happen to have a blonde friend who really likes Black Canary and I happen to be a brunette who likes Huntress and we went to the beach on friday because she's back in town and this idea came to me a few days before and I also enjoy Disneybound so sometimes I like to incorporate other pop-culture references into my wardrobe and this sentence is becoming a run on so I'm just going to get the point...

DIY Pop Culture/Nerd/Comic Book (Huntress) Sunglasses!

more appropriately called "how I DIY'ed a pair of sunglasses in homage to the coolest asskicker in Gotham.)

First thing is first, I wanted sunglasses to invoke Huntress' signature mask without being super obvious because if I was a superhero I'd totally do the same thing. I doodled out a few versions of what I thought it might look like but they all looked painfully weird and 80's. Also I can't draw sunglasses very well.
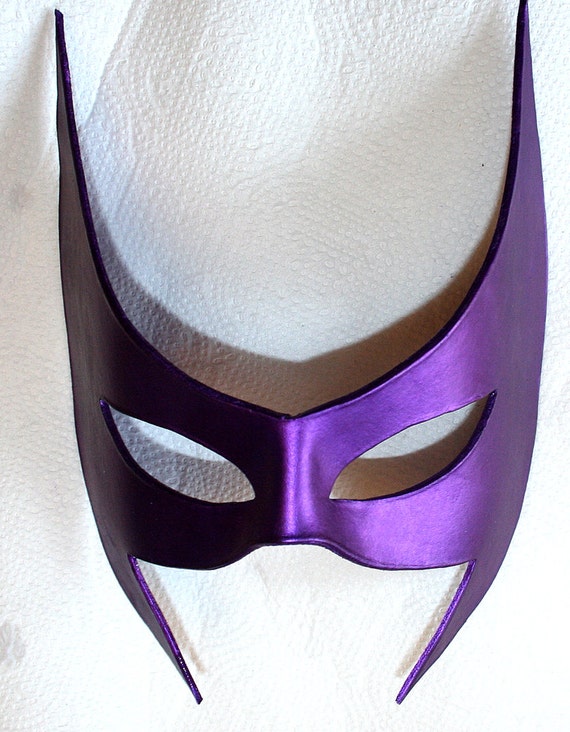
The mask in question. If you didn't know.


Finally I settled on cat-eye glasses because it invoked just enough of the pointy mask look without me having to break out the epoxy or resin.

If I had just found a stupid pair of purple cat-eyes, then I wouldn't have made a blog post about this but nooooo, I couldn't find cute purple cat-eye sunglasses that were qualified for Amazon Prime. SO:

Step 1:

Tape off the areas you don't want colored purple. Make sure to get both sides. Take lots of selfies.

And only post one. I've got class, y'know?


 Step 2:

Put on gloves and spray paint your sunglasses. Remember to actually listen to the instructions and hold the can about a foot away from your sunglasses or you'll get this weird bumpy texture from the bubbles. I clearly didn't listen.

Mini bottles of spray paint are my salvation.


 Step 3:

Go to Joannes or something while your sunglasses dry. Admire your work when you come back


I could have ended it all there and just had my purple Huntress-inspired sunglasses but I figured, in for a penny, in for a pound so I continued.

 Step 4:

Search online or through your copies of comics to find a good quote. One thing I like about Huntress is that she's very blunt. (and violent) Break out a your acrylic paint set you never use because you suck at painting, and your tiniest paint brush. (A lip makeup brush is just as small and or you can use a toothpick if you're clever.) Practice your lettering on a paper plate or something a few times before you apply your quote to the inside of your sunglasses.

"Gotham needs buttkickers..."
"...Not shining knights."


my hands shake so this step was fairly hard but I got it eventually. Overall it's not my best work but I'll get better with practice... if I ever try a project like this again.


I mean, I got what I wanted, which was a pair of purple cats-eye sunglasses. They just now have a quote hipstered away so that I can feel like this was worth the DIY.

For those of you interested in messing with your own sunglasses, here's the buzzfeed article with all the ridiculous ways you can fiddle with them this summer:


Happy summer, Bitches.

Friday, June 20, 2014

Lets try not to make this a habit.

Also known as LoL is hindering LoJ

This isn't a post (again.) This is a "I have too much work to take pictures and tell you about it." apology. Take a drink.

Sorry.


To be fair, they are sewing projects. It's just, I also finished another year of school, dyed my hair mermaid colors, went to hippie camp, moved home for a few weeks, had an internship, left said internship, am headed to animation summer school and am prepping for Labyrinth of Jareth where I will be performing with Serenata.

Also I started playing League of Legends which is a little black hole into which time just evaporates.

I keep telling myself things will calm down mid July. I don't really believe it.

So that's what's up.

My hair has blue and purple and pink in it. No Egrets. Just take a drink.

Friday, April 25, 2014

With Apologies to the Costuming Communty...

You know, the ones who went to school for this shit (you'll understand down below.)

In which I spend far too long gushing over a fantasy show's costume choices:

So on Tuesday, my friend invited me to this Game of Thrones party at the SF Armory for that Saturday. As a full-time student, this is a problem. In general, costumes take a combined week of work but that is a week of having nothing else to do other than sew. With a full schedule of classes, making a nice dress that is worthy of that costume-porn they call a show.

Seriously, please look at those DESIGNS!!!!
Basically if you want to do a good last minute costume, you're shit out of luck. The show is just too damn good to half-ass one of Cersei or Sansa's dresses. For Godsakes, they have an official embroideress! THEY HAVE SUCH ATTENTION TO DETAIL THAT THEY GOT A SPECIFIC PERSON TO EMBROIDER THIS SHIT.


This work is gorgeous and terrifying and I want to embroider EVERYTHING now.

Was there a point to this?


Uhh what was I talking about? Oh yeah. Anyway, the dress problem. I was at a loss to decide what dress to make for the event that could be done quickly. I also had the challenge of making a dress or at least finding a dress for my friend as well. Thankfully, everyone's favorite character came to my rescue.

                                             
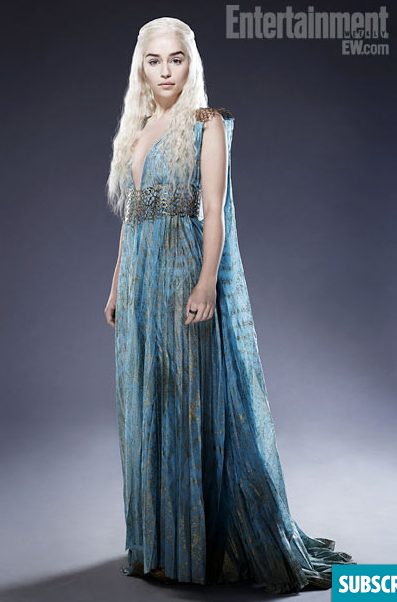
Emilia Clarke looks amazing in practically everything but the dresses she gets to wear as Dany are absolutely amazing. I've always admired the combination of metallic accents with gauzy materials and GoT simply loves doing this:


This shit is my crack


Anyway, I didn't have enough time for armor so I settled for one of Dany's easier to make dresses. (relatively) 


The pictures of her actual dress mostly show it as a pale grey crepe... linen maybe? (When I finished my dress I realized how wrong my fabric choice was. You'll see.) I I didn't set out to make an exact recreation of the dress, I just wanted a slightly similar look for the party so I'm okay with things not being exact.

The construction:


The day started with a trip to the fabric store to find the cheapest gauzy material I could find and was willing to work with. In the end I settled for a grey jersey with a layer of sheer... shiny... poly.... something vaguely lavender over it.


The right side of the sheer was SUUUUPER shiny so I chose to use the wrong side, simple enough.
 
I set to work sewing what was basically a long 2 yard rectangle of one layer of jersey and one layer of sheer together.

And it was a BITCH to do.
From there, I closed the ends of the rectangle together to form a long tube and across the top a ran a gathering thread to make it fit over my chest. Then I looked back at the pictures of the dress and realized there was more shape to the dress than I thought. I realized, if I wanted to make the dress look right with the crossed bust pieces, I'd have to take apart the fabric and re-cut it to fit a pair of bra-pads that I'd have to go out and buy. So I wracked my brain looking for an alternative solution.

Solution.
With a few seconds to think about how much I was going to regret it, I took the gathered dress-top and tacked it (pretty sloppily) my only nude bra. The result had the desired effect with the unfortunate side effect of being a little boobie-licious. From there I gathered the short end of two longer strips of leftover sheer and tacked them on to the outer end of each "cup." One of these fabric strips was threaded with an old belt-buckle I had purchased a while back as part of a my Scheherazade costume (more on that later) but wound up being too small. It's too small here too but I couldn't be bothered to change it now. Both tacked ends got crossed, and tied in back and this created the shirred chest treatment.

Not... Terrible? Seriously, I apologize to the professionals right now.
I used a thin strip and tacked it over the strap of my halter-bra and then cut two more scraps and tied them to my upper arms. Since there was some issue keeping them on, I hollywood taped them for extra hold. Overall because of my own size and the weight of the fabrics I chose, the whole dress is a little too puffy for my taste. That said, I think it's a pretty good... facsimile? Hey it worked for the event and that was the important part.

No, no it wasn't.

And then...


I still had to come up with a dress for my friend who had invited me to the event in the first place and gave me about 12 hours to purchase materials and make the damn thing.

And it still actually came out nicer.

 I essentially made a maxi skirt out of a taupe jersey to serve as a slip. I then took a few yards of pink sheer fabric and folded it in half, leaving a gratuitous amount for a train we'd then sew up. I turned the tube dress into a halter by cutting slit in the casing to hold the neck strap (which my friend had to be sewn into) and then I used some gold trim I found at Discount Fabrics for a belt. The back train was then threaded through a bracelet and sewn to the collar. The whole effect looked quite similar despite being so hastily thrown together.


conclusion


The event itself was mostly "meh." As someone who's been to a few big costume events and worked as many, I was generally unimpressed with the shindig. The set pieces they got were sort of half-assed and after the acrobatic troupe at the beginning, the whole thing felt like a glorified Bar Mitzvah... Which in the end wasn't that bad...


Considering, at the bar and bat mitzvah's I've been to, I was never allowed to get adorably schnockered.


So the night was saved, and after the first episode of the 3rd season aired, I was given a better insight into how Shay's dress was actually supposed to be done. So I will perhaps revisit that later. I still need to decide what to do with all this awful sheer purple/grey fabric but the bra is back to being a bra. Overall I'm going to say that I don't think I'll be doing a costume like this again for myself. I'm happy I was able to throw it together at all, although I think I would have been better off slapping a flower crown on my head and calling myself a Tyrell. It goes to show that sometimes you can't really cut corners and expect to be successful so y'know. You win some, you lose some.


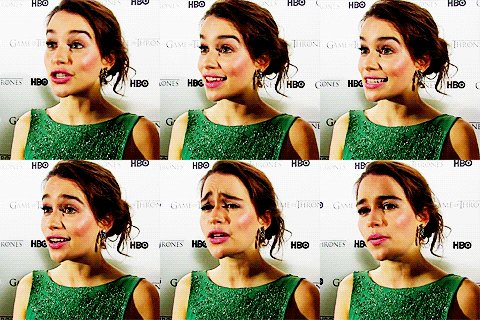
EMILIA EYEBROW APPRECIATION GIF:


Next time, probably my new Italian dress. WHO KNOWS? To be honest, I don't usually remember what I put in this bit when I post stuff.